
|
We highly recommend a licensed dentist to do your impressions for you.
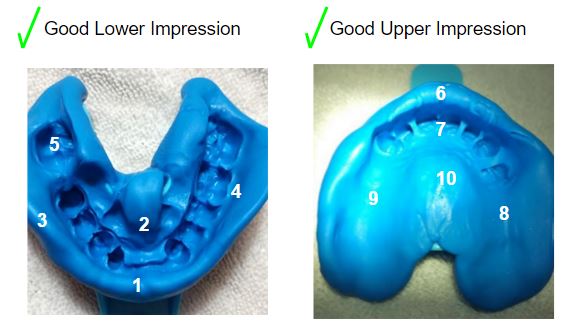
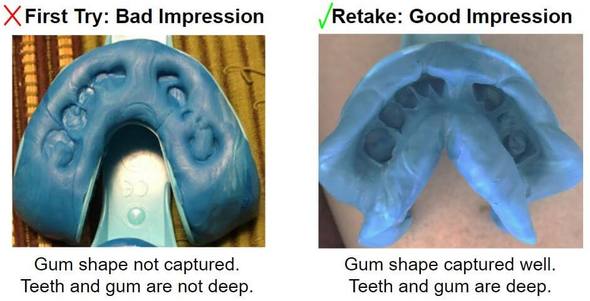  Step 1. Please go over all directions several times until you clearly understand each step. Go over the file we emailed showing good and bad impression examples. Watch YouTube videos by typing in “How to take teeth impression.” If you make a mistake, it will delay the process and cost you more money. Step 2. Wash your hands and brush your teeth. Take out the lower impression tray (lower tray is cut out in middle). Stand in front of a mirror and practice fitting it over your teeth in the center of the tray to make sure you see how it fits and feels. Remove from your mouth upwards and then out, and set it aside. Step 3. Then take out one WHITE putty and one BLUE putty. Also, set a timer for 45 seconds & use it in Step 4. Use all provided impression material to completely capture the shape of teeth and gums. Step 4. Mix very well (press&fold) one WHITE putty and one BLUE putty together with your fingers for 45 seconds to get one solid uniform blue color. Please then continue quickly to the next step. Step 5. Once your putty is one solid blue color with no white spots, quickly roll the putty and shape it into a smooth hotdog (log or finger) shape. Pick up your tray and continue to the next step quickly. Step 6. Quickly load the hotdog shaped putty into the tray & cover all parts of the tray. Putty should be leveled in the tray, but where you are missing teeth the putty should be higher to capture the shape of the gums better. Continue to the next step quickly. Step 7. Take the tray with putty in it. In front of a mirror, while facing your head down & looking up, carefully insert it into your mouth. Make sure your teeth are in the center of putty and push the tray against your teeth & gum until all teeth touch the bottom of the tray below the putty (all teeth and gum need to be deep in the putty). Hold the tray in your mouth for 5 minutes. NOTE: To avoid very common mistakes, please make sure all teeth are in center of putty and are touching the tray under the putty. Step 8. After 5 minutes, open your mouth and pull straight up or down, depending on which tray you are using, to remove the tray from teeth and then pull tray forward to remove from your mouth. Be careful not to change the shape of the impression when taking out. Repeat steps 2-8 for the upper teeth with upper tray. Do NOT remove the putty from their trays after taking the impressions; unless you need to retake it. Rinse both impressions with warm water. If you make a mistake, extra putty is available for $9.99 per impression set (plus $6.80 for shipping). Step 9. Email pictures of both impressions to [email protected] to determine if they are taken well, or you can text pictures of your impressions to (518) 952-0910; please include your name. It is important that your teeth impression is not touching the front of the tray but that it is in center of the arched putty. Also, please make sure your teeth go all the way through the putty and touch the bottom of the tray. Place the 2 impressions of your teeth (Do NOT remove putty from the trays) inside the plastic bag provided. Do not seal the bag. Choose your teeth color by matching it to the teeth color samples that are included in your kit. Step 10. Once approved through email, you can return your impressions and the filled-out form with the teeth-color number to our dental lab using the pre-paid priority box that came with your kit. We will make your custom flexible denture(s) and mail it back to you. *Do not use this kit if you have dental braces, loose teeth or if your gums are not healed after extractions. GENERAL CHECKLIST:
Michael D. Smith JR
12/11/2022 01:35:44 pm
You do offer partials correct?
Kevin Malloy
10/14/2023 08:37:29 am
I order a kit in 2020 and never unsealed the package.....i have 2 questions. Is there a self life to the dental kits, and are you still accepting the kits for processing? Leave a Reply. |
Categories
All
Archives |
 RSS Feed
Services |
CompanyWe offer high-quality flexible dentures for the best price! We make heat-injected dentures under high pressure, which results in denser, stronger, more precise and comfortable flexible dentures. Our flexible dentures improve chewing, digestion, speech and smiles. Order your impression kit today to begin restoring your smile!
|
|

We offer flexible partials made from TCS or Valplast. To learn more about TCS, click here. To learn more about Valplast, click here.
TCS and Valplast are comparable to CFS, DuraFlex, FlexStar, Flexite, Ultraflex, Sunflex, Tri-Flex, and Proflex. Words that describe our product include: removable partials, flexible partials, partial dentures, affordable partials, inexpensive partials, order partials online, upper partial, lower partial, and cost of partials.
Serving USA: Alabama, Arizona, Alaska, Arkansas, California, Colorado, Connecticut, Delaware, Georgia, Hawaii, Idaho, Illinois, Indiana, Iowa, Kansas, Kentucky, Louisiana, Maine, Maryland, Michigan, Minnesota, Mississippi, Missouri, Montana, Nebraska, Nevada, New Hampshire, New Jersey, New Mexico, New York, North Carolina, North Dakota, Ohio, Oklahoma, Oregon, Pennsylvania, Rhode Island, South Carolina, South Dakota, Tennessee, Texas, Utah, Vermont, Virginia, Washington, West Virginia, Wisconsin and Wyoming.
"For God so loved the world that He gave His only begotten Son, that whoever believes in Him should not perish but have everlasting life." John 3:16
"A cheerful look brings joy to the heart; good news makes for good health." Proverbs 15:30
"A cheerful look brings joy to the heart; good news makes for good health." Proverbs 15:30